TP-Link TL-WR842N V7~V9 无线路由器WDS无线桥接设置
时间:2024/4/24作者:未知来源:手揣网教程人气:
- TP-LINK路由器是经典的11n无线路由器,集有线无线于一体,符合802.11n(Draft 2.0)标准。采用MIMO技术,可提供更好的无线传输性能、稳定性和无线覆盖范围。同时采用CCA技术,能自动避开频道干扰并充分利用频道捆绑优势。
1、确认需要桥接的信号参数,即主路由器的无线信号名称、无线密码,以下仅做本文举例:

注意:无线桥接(WDS)的所有操作均在副路由器完成,无需设置主路由器。
2、电脑连接到副路由器的LAN口或无线信号,并使用tplogin.cn登录管理界面。
3、启用桥接应用,点击应用管理,如下:

4、找到无线桥接,点击进入:

5、进入无线桥接设置向导后,点击 开始设置,如下:

6、路由器自动扫描周边无线信号

7、选择扫描到的主路由器信号,并输入主路由器的无线密码,点击 下一步:
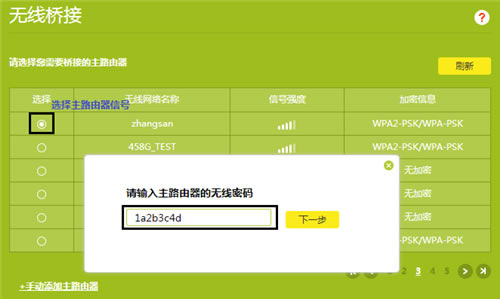
注意:如果扫描不到主路由器的信号,确认主路由器开启无线功能,且尝试减小主、副路由器之间的距离。

8、主路由器会给副路由器分配一个IP地址,用于后续管理路由器,建议记下该IP地址,点击 下一步。

9、直接点击 下一步,如下:
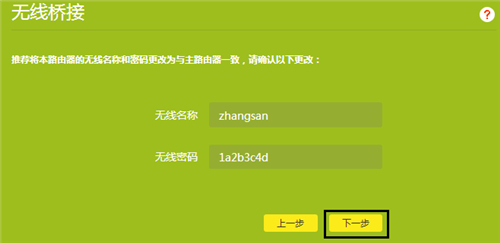
注意:此处可以设置副路由器的无线参数,但是如果要实现无线漫游,则必须保持不变。

10、再次进入 应用管理 >> 无线桥接 中,可以看到桥接状态为 桥接成功。如下:

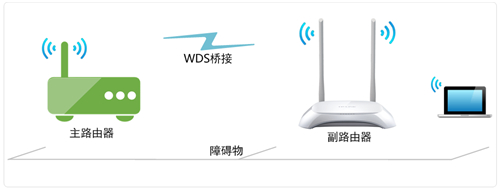
至此无线桥接(WDS)设置完成,无线终端连接zhangsan,有线电脑连接主、副路由器的LAN口即可上网。终端移动过程中,可以实现主、副路由器间的自动漫游。
TP-LINK无线路由采用UFO幽浮外观,造型时尚;信号灵敏、界面友好、功能强大、安全放心。它性价比很高,适合家庭、学生、商务人士使用。
关键词:TP-Link TL-WR842N V7~V9 无线路由器WDS无线桥接设置