TP-Link TL-WR1041N 无线路由器虚拟服务器设置方法 路由器
时间:2024/4/1作者:未知来源:手揣网教程人气:
- [摘要]TP-Link TL-WR1041N 无线路由器虚拟服务器设置方法第一步:确认服务器搭建成功设置虚拟服务器之前,需要确认以下几点:第二步:添加虚拟服务器规则1、开始设置登录路由器管理界面,进入 转发...
TP-Link TL-WR1041N 无线路由器虚拟服务器设置方法

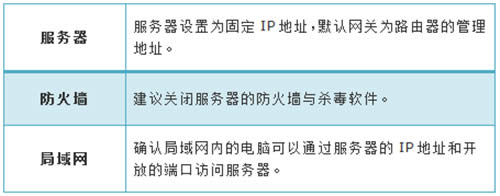
第一步:确认服务器搭建成功
设置虚拟服务器之前,需要确认以下几点:
第二步:添加虚拟服务器规则
1、开始设置
登录路由器管理界面,进入 转发规则 >> 虚拟服务器,并点击 添加新条目。

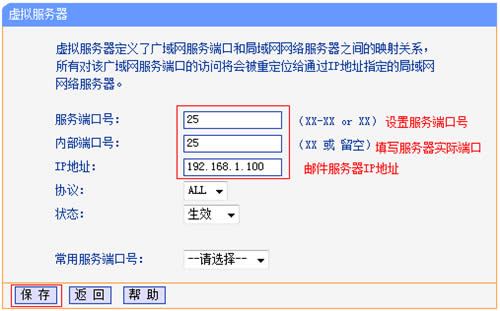
2、添加邮件服务器规则
填写邮件服务器的服务端口号(对外开放端口)、内部端口号(服务器实际端口)、服务器IP地址,然后点击 保存。
发送邮件(SMTP:25号端口):
接收邮件(POP3:110号端口):
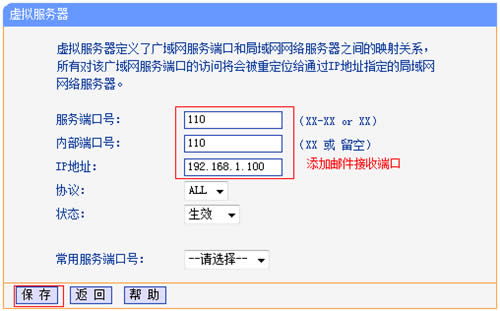
服务端口号:服务端口号为对外开放端口,即Internet访问服务器使用的端口。
3、添加网页服务器规则
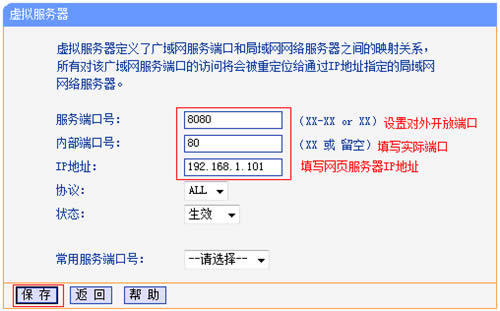
注意:服务端口号可以根据需要自行设置(如需更改,建议设置为9000以上)。无特殊需求,请将服务端口号与内部端口号一致。
4、确认规则启用
进入 转发规则 >> 虚拟服务器,如图所示表示创建成功。
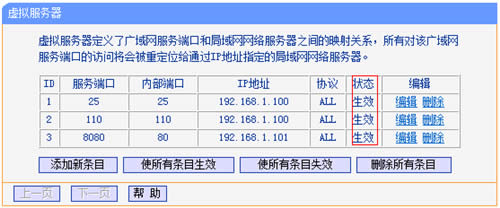
至此,虚拟服务器规则设置完成。
第三步:确认虚拟服务器设置成功
根据以上设置,Internet中的客户端通过邮件客户端软件访问121.202.33.100(WAN口IP地址),即可访问到邮件服务器。通过浏览器访问网页服务器,访问形式如下:

注意:具体的访问形式以实际服务器要求为准。
如果您的宽带并非静态IP地址,可以在 动态DNS 中申请域名账号并在路由器中登录该账号,登录后使用您的域名和开放的端口号访问服务器。
TP-LINK无线路由采用UFO幽浮外观,造型时尚;信号灵敏、界面友好、功能强大、安全放心。它性价比很高,适合家庭、学生、商务人士使用。
关键词:TP-Link TL-WR1041N 无线路由器虚拟服务器设置办法 路由器