TP-Link TL-H39RT 无线路由器添加HyFi扩展器方法 路由器
时间:2024/4/22作者:未知来源:手揣网教程人气:
- [摘要]TP-Link TL-H39RT 无线路由器添加HyFi扩展器方法第一步:将路由器及扩展器上电将TL-H39RT和HyFi扩展器插入电源插座供电,扩展器分为两种类型,上电的时候请按照以下操作:[1]...
TP-Link TL-H39RT 无线路由器添加HyFi扩展器方法

第一步:将路由器及扩展器上电
将TL-H39RT和HyFi扩展器插入电源插座供电,扩展器分为两种类型,上电的时候请按照以下操作:
[1] 扩展器无Config按钮
将扩展器插到TL-H39RT附近的插座上,一次可以同时将多个扩展器上电。
[2] 扩展器有Config按钮
每次仅将一个扩展器插到路由器附近的插座上。约15秒后扩展器的指示灯变为慢闪,此时按一下扩展器的Config按钮。
第二步:添加扩展器
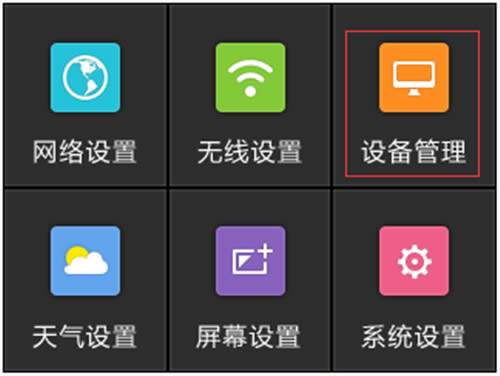
在TL-H39RT屏幕下方点击齿轮设置,如下图。

点击 设备管理,如下图。
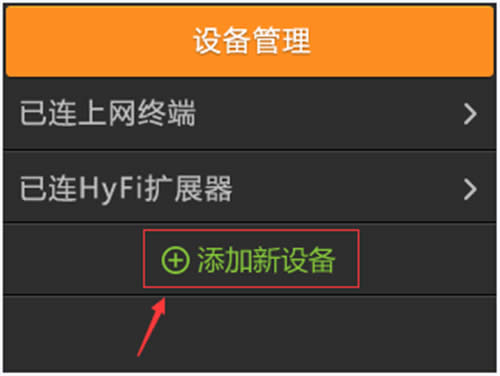
设备管理中点击 添加新设备,如下图。
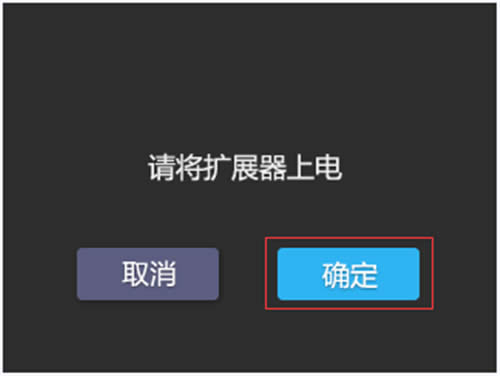
扩展器上电提示,点击 确定。如下图。
搜索到扩展器,依次点击 加入。如下图。
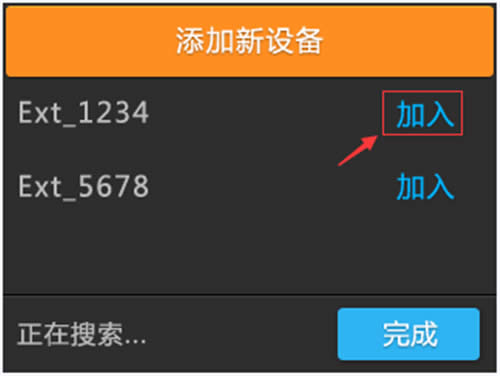
注意:1、搜索到的扩展器默认名称的后四位为扩展器MAC地址的后四位,可以在扩展器背面标贴上查看MAC地址。
2、如果搜索不到扩展器,请确认扩展器已上电或者拔插一下扩展器。并且带有Config按钮的扩展器需要先按一下其Config按钮。
显示已加入,点击 完成。如下图。
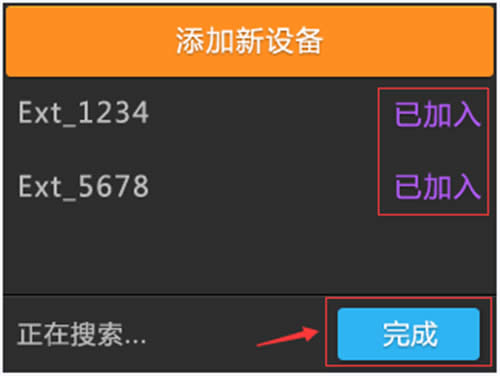
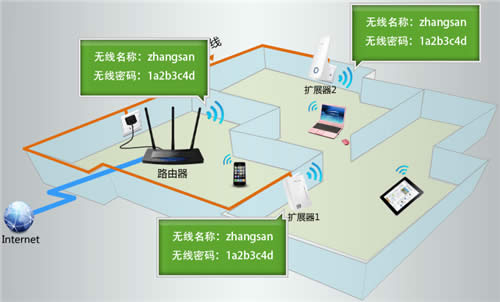
至此,添加扩展器完成,网络扩展成功。TL-H39RT的无线配置被自动推送到扩展器,一起组成相同无线名称和无线密码的无线覆盖网络,无线终端连接扩展器的无线信号也能上网。
 TP-LINK无线路由采用UFO幽浮外观,造型时尚;信号灵敏、界面友好、功能强大、安全放心。它性价比很高,适合家庭、学生、商务人士使用。
关键词:TP-Link TL-H39RT 无线路由器添加HyFi扩展器办法 路由器