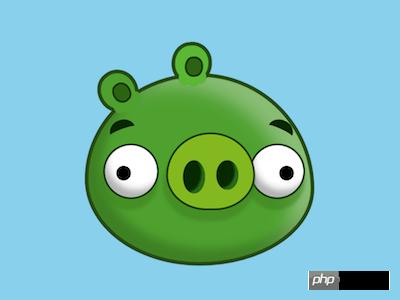
如何使用纯CSS完成一头绿猪的效果
时间:2024/11/5作者:未知来源:手揣网教程人气:
- [摘要]本篇文章给大家带来的内容是关于如何使用纯CSS实现一头绿猪的效果,有一定的参考价值,有需要的朋友可以参考一下,希望对你有所帮助。效果预览源代码下载每日前端实战系列的全部源代码请从 github 下载...本篇文章给大家带来的内容是关于如何使用纯CSS实现一头绿猪的效果,有一定的参考价值,有需要的朋友可以参考一下,希望对你有所帮助。
效果预览

源代码下载
每日前端实战系列的全部源代码请从 github 下载:
https://github.com/comehope/front-end-daily-challenges
代码解读
定义 dom,容器中包含 3 个元素,分别代表耳朵、眼睛、鼻子:
<p class="pig">
    <span class="ears"></span>
    <span class="eyes"></span>
    <span class="nose"></span>
</p>
居中显示:
body { margin: 0; height: 100vh; display: flex; align-items: center; justify-content: center; background-color: skyblue; }设置伪元素的共有属性,后面有多处用到伪元素:
.pig::before, .pig::after, .pig *::before, .pig *::after { content: ''; position: absolute; }定义容器尺寸:
.pig { width: 12em; height: 10em; font-size: 20px; background-color: #50a032; border: 0.2em solid #2b4d13; }用圆角属性画出头部轮廓:
.pig { border-radius: 50% 50% 50% 50% / 55% 60% 40% 45%; }画出鼻子的轮廓:
.pig { position: relative; } .nose { position: absolute; width: 4.6em; height: 4em; background-color: #82b923; border: 0.1em solid #1d3c07; border-radius: 50% 50% 45% 45% / 55% 55% 45% 45%; top: 3em; left: 4.2em; }用伪元素画出鼻孔:
.nose::before, .nose::after { width: 1.2em; background-color: #0f2d00; border-radius: 50%; top: 1.4em; } .nose::before { left: 0.8em; height: 1.8em; } .nose::after { right: 0.8em; height: 1.6em; }画出眼睛的轮廓:
.eyes::before, .eyes::after { width: 2.8em; height: 2.8em; background: white; border-radius: 50%; border: 0.1em solid #193c09; top: 3.6em; } .eyes::before { left: 0.8em; } .eyes::after { right: 0.3em; }用径向渐变画出眼珠:
.eyes::before, .eyes::after { background: radial-gradient( circle at var(--eyeball-left) 1.5em, black 0.4em, transparent 0.4em ), white; } .eyes::before { --eyeball-left: 1em; } .eyes::after { --eyeball-left: 1.9em; }画出内耳的轮廓:
.ears::before, .ears::after { width: 0.8em; height: 0.9em; background-color: #2f6317; border: 0.1em solid #1d3a0d; border-radius: 45% 45% 45% 45% / 55% 45% 55% 45%; } .ears::before { top: 0.3em; left: 1.3em; } .ears::after { top: -1.1em; right: 5.8em; }用阴影画出外耳:
.ears::before { color: #50a032; box-shadow: 0.4em 0.7em 0 -0.2em, -0.2em 0.7em 0 -0.1em, -0.6em 0.5em 0 -0.2em, -0.1em -0.2em 0 0.4em, -0.1em -0.2em 0 0.6em #2b4d13; transform: rotate(-40deg); } .ears::after { color: #5cb739; box-shadow: 0.3em 0.6em 0 -0.2em, -0.1em 0.6em 0 -0.1em, -0.6em 0.6em 0 -0.2em, -0.1em -0.2em 0 0.4em, -0.1em -0.2em 0 0.6em #2b4d13; transform: rotate(-6deg); }用伪元素画出眉毛:
.pig::before, .pig::after { width: 1.4em; height: 1em; border-top: 0.5em solid #0f2d00; top: 2.3em; border-radius: 50% 50% 0 0 / 40% 40% 0 0; } .pig::before { left: 1.2em; transform: rotate(-20deg); } .pig::after { right: 1em; transform: rotate(25deg); }接下来设置阴影,增加立体效果。
为头部增加阴影效果:.pig { box-shadow: inset -1.5em 1em 1.5em -0.5em rgba(255, 255, 255, 0.3), inset 0.5em -0.5em 0.8em 0.2em rgba(0, 0, 0, 0.2); }为鼻子增加阴影效果:
.nose { box-shadow: -0.1em 0.5em 0.2em 0.1em rgba(68, 132, 36, 0.6); } .nose::before, .nose::after { box-shadow: inset -0.3em -0.2em 0.1em -0.1em #2d6b1f; }为眼睛增加阴影效果:
.eyes::before, .eyes::after { box-shadow: inset 0.3em -0.6em 0.5em -0.2em rgba(0, 0, 0, 0.3), -0.1em 0.5em 0.2em 0.1em rgba(68, 132, 36, 0.6); }相关文章推荐:
如何使用CSS实现圆点移动的动图效果
如何使用CSS实现变色旋转动画的动态效果
以上就是如何使用纯CSS实现一头绿猪的效果的详细内容,更多请关注php中文网其它相关文章!
网站建设是一个广义的术语,涵盖了许多不同的技能和学科中所使用的生产和维护的网站。
关键词:如何运用纯CSS完成一头绿猪的效果